Hari Raya Aidilfitri is just around the corner. Time passed by so fast and the next thing you know, you have to get busy with the preparations. One of the many things most Malay households have to prepare are the kueh-mueh or the Hari Raya biscuits or cakes. The usual question is “Dah beli kueh? Beli ke buat?” in English it’s “Have you bought the biscuits or cakes for Hari Raya? Did you make or buy it?”.
Well, this year after so many years I am making it myself. The hubby suggests to buy it as usual. But I want to try baking the biscuits. This is a good opportunity to test recipes and compile the best ones for future use and share it with my loved ones and friends. So I started with something simple (or so I thought..) like making Biskut Suji.
I searched online and there are many recipes on suji (semolina) biscuits and its variations. However finding reliable ones is like finding a needle in a haystack. Almost all the pictures looked great, captivating and all. But when I try the recipe, most of the time I am in for a disappointment. For example the measurements are inaccurate or the steps are vague or downright dubious. For example, some recipes ended with “..once you have divided the dough and formed into balls, place it in the oven to bake.” At what temperature? For how long? How big should the balls of dough be?
And some do not even state how many it will make so when they call for 1 kilogram of flour, I skipped that recipe. I’m definitely not baking for several families.
So below is my version of making Biskut Suji or Semolina biscuits. This is the basic recipe, some would try something more fancy like adding cashew flour or custard powder and all. Mine’s the simple version but it worked. I tried to document the steps as much as I could and even go to the extreme of taking note of the measurement of the dough balls because it may affect the baking time and temperature I think.
Preparation Time: 30-45 minutes (to find, weigh, cut etc)
Makes: Approximately 90 pieces
Baking Time: 13-18 minutes (I used a stopwatch to measure the time)
Preheat oven to 160 degrees Celsius
Ingredients you will need:
- 350 grams or 3 cups of plain flour or all-purpose flour
- 100 gram or 1 cup of icing sugar
- 150 gram or 1 cup of semolina flour
- 100 gram ghee or clarified butter
- Some glaced cherries, diced to 0.5cm to decorate the top of each biscuit.
Method:
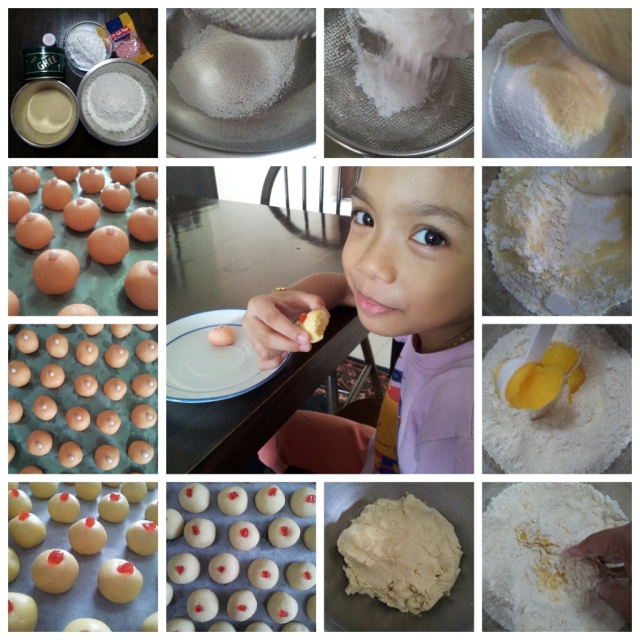
Clockwise from top-left: Making Biskut Suji (Semolina Biscuit). Also see my little kitchen assistant.
- Sift the plain flour and icing sugar into a large bowl. Add the semolina flour. Mix well.
- Next add in the ghee or clarified butter, a little at a time. Knead the mix until it’s slightly firm (You can use your hands or a spatula. I used my hands for this job) and you can form a small ball with the dough without it crumbling.
-
Form a little of the dough into a small ball measuring about 1 inch in diameter or at least 2 centimeters. Place the balls into a baking tray and topped each with a diced cherry.
- Then bake it in the preheated oven for at least 13 minutes after which you check if the biscuit is cooked. The base of the biscuit should be slightly brown or the biscuit cracked a little at the top. These are signs the biscuit are cooked. Do not undercooked because it will not last long and will get moldy faster.
- Once cooked, leave it on the tray for a couple of minutes. Do not touch when it’s hot because it is soft. Once cooled, you can transfer to a wire rack to completely cool then store it in a container. Do not close the container if you can still feel that it is warm after storing the biscuits.
There, mission accomplished. I jotted down every little detail I could so that you wouldn’t go wrong if you followed my recipe. However, I have to inform you that different types of oven may yield different results. Here I am using a toaster oven because I am making a small amount. You can use your own type of oven, just take the precaution to reduce the temperature first if you are unsure. Better to have undercooked biscuits that can still be salvaged than burnt biscuits right?
Do take a look below on how it should look when it’s cooked.
Do give it a try if you have the time, improve this recipe and share so that others can benefit ya. Happy Cooking!


I tried your recipe and it turned out well. Thank you. I loved the way you detailed every step and process involved, complete with photographs – very “journalist” of you. 🙂
Hi Malar, it’s my pleasure and thank you for dropping by and even trying my recipe.
I try to make my steps as clear as possible especially when it come to shaping dough.
I’ve gone through difficulties myself trying out recipes that don’t always have clear instructions and it’s very hard to visualize.
Glad that you like it and sorry it took a while for me to respond.
However I shall post more regularly now since I have more time and hope you stay tuned ya 🙂
Thanks for sharing! It is not Raya (Raya Haji just over), but being away from home for years and years, I’ve decided to bake all my favorite goodies. Biskut suji is one of them… this is perfect for kid too.
Hi missenelly, Thanks for dropping by and am happy to hear you took the time to bake especially traditional cookies.
It’s my pleasure to share and sorry it took a while for me to respond due to work commitments now.
I see you are very into Korean, me too :P, I can watch Korean sitcom for hours on end 😛
Do give any of my recipes a try or even suggest some, maybe it will inspire me more.
Have a nice day ahead ya 🙂
Pingback: Biskut Suji (Semolina Biscuits) | The Malay Kitchen | Hari Raya Info
Oh my god… your biskuits look so good… have been cravings for suji biskuits for a long time. Its been 20 years since I last had them (the last time when I was in Singapore). Well, I’m definitely going to try my hand at baking those.. thanks a bunch for the clear step-by-step (and with pics!) instructions. 🙂
Wow, that’s a pretty long time Ms Kaur, hope you get to try it soon. 🙂
Thanks for the recipe. The cookies turns out very well, but I have to add more ghee to make the dough pliable.
not so complicated I love nice and simple to understand